
[NNStreamer] Gstreamer 기본 튜토리얼 10
Goal
- How to build and run GStreamer pipelines from the command line, without using C at all!
- How to find out what GStreamer elements you have available and their capabilities.
- How to discover the internal structure of media files.
Introduction
$ sudo apt install gstreamer1.0-tools
This tool accepts a textual description of a pipeline, instantiates it, and sets it to the PLAYING state. It allows you to quickly check if a given pipeline works, before going through the actual implementation using GStreamer API calls.
Bear in mind that it can only create simple pipelines. In particular, it can only simulate the interaction of the pipeline with the application up to a certain level. In any case, it is extremely handy to test pipelines quickly, and is used by GStreamer developers around the world on a daily basis.
Please note that gst-launch-1.0 is primarily a debugging tool for developers. You should not build applications on top of it. Instead, use the gst_parse_launch() function of the GStreamer API as an easy way to construct pipelines from pipeline descriptions.
Elements
In simple form, a PIPELINE-DESCRIPTION is a list of element types separated by exclamation marks (!). Go ahead and type in the following command:
$ gst-launch-1.0 videotestsrc ! videoconvert ! autovideosink
You should see a windows with an animated video pattern. Use CTRL+C on the terminal to stop the program.
This instantiates a new element of type videotestsrc (an element which generates a sample video pattern), an videoconvert (an element which does raw video format conversion, making sure other elements can understand each other), and an autovideosink (a window to which video is rendered). Then, GStreamer tries to link the output of each element to the input of the element appearing on its right in the description. If more than one input or output Pad is available, the Pad Caps are used to find two compatible Pads.
Propertires
Properties may be appended to elements, in the form *property=value *(multiple properties can be specified, separated by spaces). Use the gst-inspect-1.0 tool (explained next) to find out the available properties for an element.
$ gst-launch-1.0 videotestsrc pattern=11 ! videoconvert ! autovideosink
Named elements
Elements can be named using the name property, in this way complex pipelines involving branches can be created. Names allow linking to elements created previously in the description, and are indispensable본질적인 to use elements with multiple output pads, like demuxers or tees, for example.
Named elements are referred to using their name followed by a dot. 이름이 붙혀진 요소를 사용할 때는 뒤에 .을 붙혀서 사용합니다.
$ gst-launch-1.0 videotestsrc ! videoconvert ! tee name=t ! queue ! autovideosink t. ! queue ! autovideosink
You should see two video windows, showing the same sample video pattern. If you see only one, try to move it, since it is probably on top of the second window.
This example instantiates a videotestsrc, linked to a videoconvert, linked to a tee (Remember from Basic tutorial 7: Multithreading and Pad Availability that a tee copies to each of its output pads everything coming through its input pad). The tee is named simply ‘t’ (using the name property) and then linked to a queue and an autovideosink. The same tee is referred to using ‘t.’ (mind the dot) and then linked to a second queue and a second autovideosink.
이 부분은 Basic-Tutorial-For-Gstreamer-7에서 다루었던 내용입니다. tee에 대해서 모르면 여기를 보고 오세요. 아래와 같이 연결됩니다.
 videotestsrc ! videoconvert ! tee name=t  ┬  queue ! autovideosink
                                           ┸  queue ! autovideosink
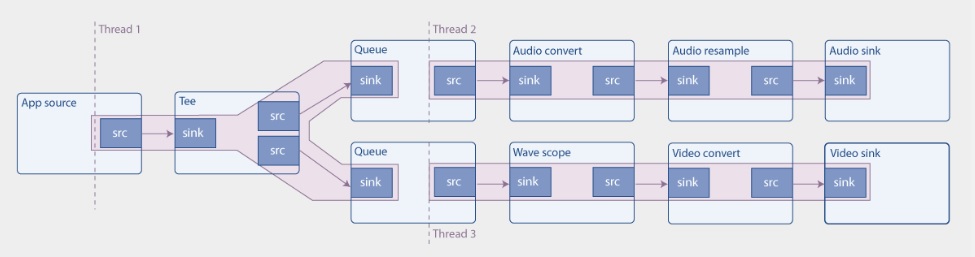
아래는 참고할만한 그림입니다.
Pads
Instead of letting GStreamer choose which Pad to use when linking two elements, you may want to specify the Pads directly. You can do this by adding a dot plus the Pad name after the name of the element (it must be a named element). Learn the names of the Pads of an element by using the gst-inspect-1.0 tool.
This is useful, for example, when you want to retrieve one particular stream out of a demuxer:
$ gst-launch-1.0 souphttpsrc location=https://www.freedesktop.org/software/gstreamer-sdk/data/media/sintel_trailer-480p.webm ! matroskademux name=d d.video_00 ! matroskamux ! filesink location=sintel_video.mkv
This fetches a media file from the internet using souphttpsrc, which is in webm format (a special kind of Matroska container, see Basic tutorial 2: GStreamer concepts). We then open the container using matroskademux. This media contains both audio and video, so matroskademux will create two output Pads, named video_00 and audio_00. We link video_00 to a matroskamux element to re-pack the video stream into a new container, and finally link it to a filesink, which will write the stream into a file named “sintel_video.mkv” (the location property specifies the name of the file).
All in all, we took a webm file, stripped it of audio, and generated a new matroska file with the video. If we wanted to keep only the audio:
All in all, we took a webm file, stripped it of audio, and generated a new matroska file with the video. If we wanted to keep only the audio:
$ gst-launch-1.0 souphttpsrc location=https://www.freedesktop.org/software/gstreamer-sdk/data/media/sintel_trailer-480p.webm ! matroskademux name=d d.audio_00 ! vorbisparse ! matroskamux ! filesink location=sintel_audio.mka
The vorbisparse element is required to extract some information from the stream and put it in the Pad Caps, so the next element, matroskamux, knows how to deal with the stream. In the case of video this was not necessary, because matroskademux already extracted this information and added it to the Caps.
Note that in the above two examples no media has been decoded or played. We have just moved from one container to another (demultiplexing and re-multiplexing again).
Caps filters
When an element has more than one output pad, it might happen that the link to the next element is ambiguous: the next element may have more than one compatible input pad, or its input pad may be compatible with the Pad Caps of all the output pads. In these cases GStreamer will link using the first pad that is available, which pretty much amounts to saying that GStreamer will choose one output pad at random.
$ gst-launch-1.0 souphttpsrc location=https://www.freedesktop.org/software/gstreamer-sdk/data/media/sintel_trailer-480p.webm ! matroskademux ! filesink location=test
This is the same media file and demuxer as in the previous example. The input Pad Caps of filesink are ANY, meaning that it can accept any kind of media. Which one of the two output pads of matroskademux will be linked against the filesink? video_00 or audio_00? You cannot know.
Filters :
$ gst-launch-1.0 souphttpsrc location=https://www.freedesktop.org/software/gstreamer-sdk/data/media/sintel_trailer-480p.webm ! matroskademux ! video/x-vp8 ! matroskamux ! filesink location=sintel_video.mkv
A Caps Filter behaves like a pass-through element which does nothing and only accepts media with the given Caps, effectively resolving the ambiguity. In this example, between matroskademux and matroskamux we added a video/x-vp8 Caps Filter to specify that we are interested in the output pad of matroskademux which can produce this kind of video.
How to check Caps
- To find out the Caps an element accepts and produces, use the
gst-inspect-1.0 tool. - To find out the Caps contained in a particular file, use the
gst-discoverer-1.0 tool. - To find out the Caps an element is producing for a particular pipeline, run gst-launch-1.0 as usual, with the –v option to print Caps information.
Example
- Play a media file using playbin (as in Basic tutorial 1: Hello world!): A fully operation playback pipeline, with audio and video (more or less the same pipeline that playbin will create internally):
$ gst-launch-1.0 playbin uri=https://www.freedesktop.org/software/gstreamer-sdk/data/media/sintel_trailer-480p.webm
그리고 아래는 위 명령와 같이 영상과 소리를 모두 재생하는 window를 하나 띄우는 예제입니다.
$ gst-launch-1.0 souphttpsrc location=https://www.freedesktop.org/software/gstreamer-sdk/data/media/sintel_trailer-480p.webm ! matroskademux name=d ! queue ! vp8dec ! videoconvert ! autovideosink d. ! queue ! vorbisdec ! audioconvert ! audioresample ! autoaudiosink
//Structure
gst-launch-1.0 souphttpsrc location={omission} ! matroskademux name=d ┬ queue ! vp8dec ! videoconvert ! autovideosink
                                                                   d. ┻ queue ! vorbisdec ! audioconvert ! audioresample ! autoaudiosink
- A transcoding(하나의 인코딩을 다른 인코딩으로 직접 디지털-디지털로 변환하는 과정) pipeline, which opens the webm container and decodes both streams (via uridecodebin), then re-encodes the audio and video branches with a different codec, and puts them back together in an Ogg container (just for the sake of it).
$ gst-launch-1.0 uridecodebin uri=https://www.freedesktop.org/software/gstreamer-sdk/data/media/sintel_trailer-480p.webm name=d ! queue ! theoraenc ! oggmux name=m ! filesink location=sintel.ogg d. ! queue ! audioconvert ! audioresample ! flacenc ! m.
//structure
gst-launch-1.0 uridecodebin uri={omisstion} name=d ! queue ! theoraenc ! oggmux name=m ! filesink location=sintel.ogg
                                                d. ! queue ! audioconvert ! audioresample ! flacenc ! m.
gst-inspect-1.0
This tool has three modes of operation:
- Without arguments, it lists all available elements types, this is, the types you can use to instantiate new elements.
- With a file name as an argument, it treats the file as a GStreamer plugin, tries to open it, and lists all the elements described inside.
- With a GStreamer element name as an argument, it lists all information regarding that element.
The most relevant sections are:
Pad Templates: This lists all the kinds of Pads this element can have, along with their capabilities. This is where you look to find out if an element can link with another one. In this case, it has only one sink pad template, accepting only video/x-vp8 (encoded video data in VP8 format) and only one source pad template, producing video/x-raw (decoded video data).Element Properties: This lists the properties of the element, along with their type and accepted values. For more information, you can check the documentation page of gst-inspect-1.0.
gst-discoverer-1.0
To find out the Caps contained in a particular file, use the gst-discoverer-1.0 tool.